Reclaim an Old Chair into an Accent Piece!

chair


My favorite thing to go hunting for these days are chairs! I love finding unique, old chairs. This one caught my eye and we just had to upcycle it! We had to throw a few layers of paint on it (We use a paint sprayer to keep things evenly coated) and voila! Here sits a cute, fun chair with a chevron pillow! I find I can add chevron to just about ANYTHING and it makes it new again! 🙂


Enjoy you inspiration!

Pallette Wood Shelf DIY

Pallette

Palettes are all the craze right now and the possibilities are absolutely ENDLESS. We love the tables, chairs, deck decor, etc that people have been coming up with to re-use palettes. We found this palette in a stack and thought it would make a cute shelf! This project is so unbelievably easy to make, and I can’t wait to share it with you!

So really all you need is some paint and a pallette, but we recommend actually using a paint sprayer to apply the paint. The reason is that palette wood easily soaks in paint, so when you paint it you will find that you are actually helping it press into the wood. By using a paint sprayer, you arent applying pressure which makes the paint stick a little better. And thats it folks. All palettes are made differently so the nice thing is that no two shelves are the same. We did remove two pieces of wood from the back to open it up a bit more, (the back becomes the front because you actually hang the front of the pallette on the wall.)


And, VOILA! You have created a great piece of decor for your home!

Twine Bottle Decoration

supplies2

I am always looking for unique ways to decorate jars and bottles instead of throwing them away, I call it my way of “being green” and recycling! I have seen this project floating around everywhere and just had to try it! And since I bought a gigantic roll of twine at a garage sale for $1.00, I thought it would be a great way to use it up!


Supplies Needed:

supplies1

Twine

Glue Gun & Plenty of Refills

Bottle of some sort, I used a Mikes Hard Lemonade bottle and a Starbocks Frapp bottle. I also will be making one using a Mason Jar too! (EMPTY THE BOTTLE and wash it)

Instructions:

To start, you are going to just put a line of glue around the bottom of the bottle to start your first layer. Go all the way around. Eventually, you can start just putting a dot of glue on the back and the front just to make sure it stays in place but as far as the bottom layer goes, you are going to want to put the glue all the way around so it stays in place. Wrap the twine around, continue until you make a full circle, and then place more glue around the bottle for the next layer. Continue this until you get to the top. Make sure you wrap it tight and as close to the layer below to ensure you cannot see through the bottle. Voila! You are done!

supplies3


Chore Chart Inspiration & Tutorial!

For those of you who are having a tough time organizing your chore chart, let this be a fun and rewarding addition to your home, and the best part is, It isn’t just a printed piece of paper, it is a WORK OF ART!

OK, so many of you are probably thinking, I cant do that. The thing is, YOU CAN. This project is probably the most simple ever. With just a few supplies, you are off to a great start! I will walk you through this project in this blog post, and show you some amazing products to help you accomplish the chore chart of your dreams! Say that there times!

Screen shot 2014-01-07 at 7.01.13 PM

So, we need a few things to get started..

So lets get started. Let me start off by saying that the artwork above was not created by me, so I am just guiding you based on how I would create this fabulous work of art.

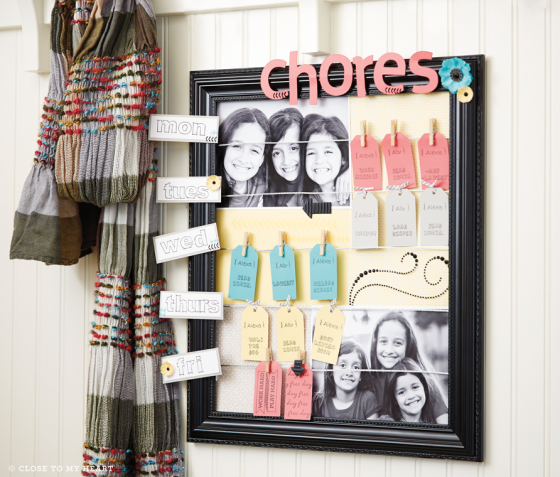
Step One. Lets start off with the background, You will start with a 12×12 piece of Cardstock of your color choice. I would stick with something simple, and use photos that tell your story!

Step Two: Adhere your photos and embellishments. Again, I wouldn’t get too crazy, just enough to tell a story!

Step Three: Stamp your Days of the Week on Cardstock and cut around. Adhere to the frame.

Step Four: Create tags using your Cricut, a Diecut, or anyway you would, to add chores on. You can add chores by typing & printing, or using a smaller size alphabet stamp set.

Step Five: Decorate with some Embellishments, and VOILA! ARTWORK THAT SERVES A PURPOSE!

If you stay tuned, you will find all sorts of other tutorials coming right up!

shoponline_07